As I approach one year of trailer ownership, I finally decided to sit down and add up how much this purchase has actually cost us. I saved receipts for this purpose but couldn’t bring myself to face reality until now. I survived the process and decided to share the results. New or potential owners should know that the final price on their purchase contract is just the beginning of the financial hemorrhage that can come with a trailer or RV. I have managed to drop a small fortune at Camping World, Wal-mart, and Amazon in the past year. I have particular sympathy for our UPS driver who had to deliver a few 50+ pound packages.
If there is a camping supply store attached to your dealership, you may be lucky enough to get a discount coupon for a shopping trip. Be aware that online prices may be better. Camping World offered a shopping guide who helped me decide which basics I needed, but she wasn’t nearly as knowledgable as the nice folks on the internet. Camping World prices also trend high, even with the Good Sam membership discount. However, I negotiated a gift card into the purchase of our trailer, making the sticker shock of our initial trip a little less.
My current spreadsheet of purchases is well over 100 items, so I have decided to break down what I spent in sections, starting with:
The Basic Outfitting of the Trailer
These are the things you will need to get started on trailering. Unfortunately, the most important items are some of the most expensive. A few of these items may not be necessary based on how you intend to camp and what is available at your campgrounds, but it is what I would suggest a newbie buy to have a happily functioning trailer.
- Sewer hose – A lot of trailers come equipped with a cheap stinky slinky, but I am of the opinion that when I am that close to fecal matter, quality counts. I also like the clear elbow connector that allows you to see when the water runs clear or stops running. I went with a Rhino set. I thought longer may be better when I purchased, but I would go with two shorter lengths that could connect if I were buying today. I almost always dump at dump stations, so extra length just means more places for sewage to pool. $61.99
- Plastic gloves – While we are on the subject of sewers, let’s talk about protection. I have tried various options and like the Camco disposable gloves best. They easily slide on and off, protect well, and come in a sturdy-enough dispenser. $5.79
- Water hose – Be sure to buy a drinking-water-safe hose. Again, mine is probably longer than necessary since I most often fill up our fresh water tank when I get to a campground. But we used every one of our 25 feet at Middle Fork campground. $9.97
UPDATE: I have switched to the 50 foot Zero-G RV hose. So many of the Kentucky campgrounds offer water at every other spot and the extra length has come in handy more than once. - Power cord – was included with our trailer $0
- Dogbone adapters – I have a 30-amp trailer and so far, every campground with electric hookups has a 30-amp plug. However, I like to be prepared, so I have 50 and 15-amp adapters. I have read the dogbone versions are much better. $30.45 for both
- Power surge/voltage protector – This is an absolute must to protect your investment. I can’t explain why this is the one you want, but I have seen enough sketchy electric pedestals at campgrounds to know I would never hook up without one. Be aware that there are cheaper surge protectors out there that do not protect against high/low voltage. I am told the voltage issue is just as, if not more, important. Again, I am trusting those with much greater expertise that I have. $194.71
UPDATE: I ended up switching from the Camco to the Progressive EMS for $282. After about three years, the Camco version stopped working. The Progressive product supposedly has a lifetime warranty. I also like that it has codes describing the problem if there is one. Camco only shows red or green lights. - Water pressure regulator – This is the surge protector of the water system. I keep one on my hose at all times. $4.39
- Levelers – You must have some sort of system to level your trailer from side-to-side. Frugal campers use pieces of wood. The next step up are the lego-based systems. I am too lazy for that and chose the complete Andersen leveler set for dual axle trailers that includes the jack and carrying bag. Note that if you choose another system, you will need some sort of jack for the trailer in case of a flat. Unlike cars, a jack is not included with trailers. Surprise! $189.99
UPDATE: I can no longer recommend this product. The owner of this company was recently caught vandalizing Corona Arch in Utah despite the protests of fellow hikers. It seemed he “learned better” only after learning that his actions could result in a $100,000 fine and a year in jail. Preserving our nation’s landmarks are much more important to me than any trailer product. I will suggest trying the Camco levelers instead. - Tank deodorizer – I have tried a lot of brands and settled on Happy Camper as my favorite. The large jar is pricey, but I think it will last at least a year. And it works for the gray water tank too. $34.45
- Water Bandit – You don’t need a Water Bandit until you do! Buy one because of it’s great name. But when you pull into a state park campground that doesn’t have a threaded potable water source, you will be grateful you can fill your water tank. $6.63
- Weight distribution hitch with sway bar – When I bought my trailer, I thought I had gone with something light enough for my truck and I wouldn’t need a WDH. After a couple rough trips, we weighed my trailer and found the tongue weight was much higher than we expected and outside the recommended 10-15%. A WDH with sway bar made towing so much easier. Worth every penny. $227

- Furrion RV Observation System – Again, this was on my initial to-be-purchased-later list. But on the first trip down a country road I realized I had no idea if cars were following behind. It is a little disorienting to suddenly be passed by a car you didn’t know was there. Likewise, the camera works great for monitoring the surrounding lanes when on the highway. Our Mini Lite was pre-wired for the Furrion camera so installation was simple. Be aware that some listings online are for backup cameras which only function when the vehicle is in reverse whereas an observation camera is available whenever the vehicle’s accessory lights are on. $279
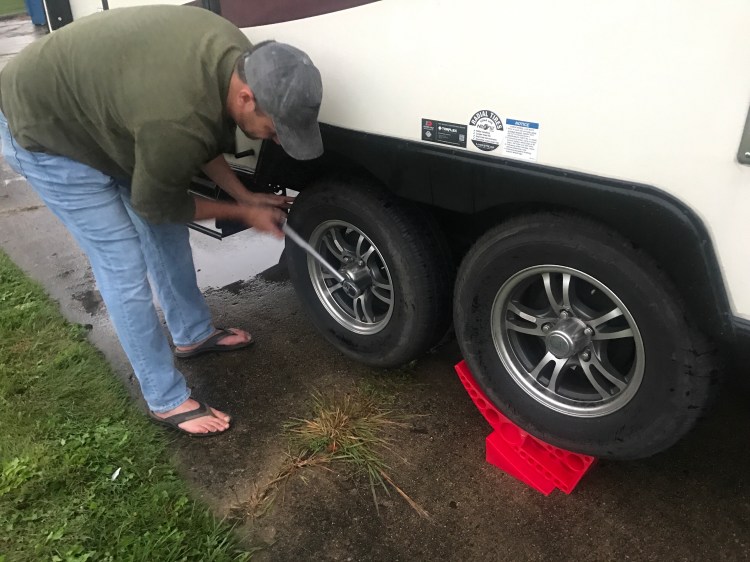
- Torque wrench with sockets for lug nuts and hot water plug – It only took a few stories of trailers loosing wheels on the highway to convince me that checking the lug nuts with a torque wrench was essential before every trip. Being able to drain the hot water tank is a bonus. $41.10+$17.20 for socket set
- Tire pressure gauge – Proper trailer maintenance also means checking tire pressures every time. We happened to catch one on clearance, but it is similar to this one. $23.95
Total = $1,126.62
Yeah. That is the heart attack inducing number of what it takes to get on the road. Of course, it can be done cheaper, but we consider it a small price to enjoy our purchase in safety and comfort.
But our spending isn’t over. Check out some of the optional items we added.

Very interesting!
Not sure I have all of that, but I will be checking!
LikeLike